In my previous post, I summarized my first year at MIT CSAIL, in which I was mostly dedicated to a single home service robotics projects. My role going into this second year has morphed into something quite different. Now, I find myself supporting several projects around our research group. With all these different efforts, it suddenly became very easy for the software in one project to mess up the others.
This is where Docker came in to make this manageable. I have been heavily relying on it to manage my projects in an isolated manner and generally making sure that everyone else is able to run the same code without having to go through a painstaking manual installation process. It took a while to learn, but now I can’t see myself not using Docker.
Given that I’m working in academic robotics, all these projects have one thing in common: they all use the Robot Operating System (ROS). In this post, I want to share my experiences with Docker specifically for managing ROS based software projects. To help show this, I have developed an example GitHub repository that uses a simulated ROBOTIS TurtleBot3.

Why Docker with ROS?
In my Continuous Integration post, I motivated the need to isolate software environments, and pointed to the difference between virtual machines and containers. To recap, Docker is one platform for managing containers. The official Why Docker? page has the best possible description for containerization: solving the “it works on my machine” headache.
That gets into our next question: If ROS is designed with stable, long-term support releases (e.g., Noetic, Foxy) and comes with its own package management systems (e.g., catkin, colcon) … is it really necessary to go as far as Docker to manage ROS based projects?
While ROS certainly eases the process of getting started with existing software packages and/or distributing your own packages, I still think there are key reasons that make it worthwhile to use containers. Namely,
- Reproducibility: If you want others to reproduce your work as painlessly as possible, you could provide a detailed README with all the necessary dependencies, installation steps, troubleshooting tips, etc. Alternatively, you could handle all those potentially tricky dependencies inside a Docker container that you can test yourself before sharing that with a (hopefully) much easier set of instructions to get things running.
- Switching Between Projects: Even if you’re a pro ROS system integrator or you’ve developed a watertight installation guide, chances are multiple projects will have conflicting dependencies. If you’re working on projects that use different versions of ROS (or different versions of software in general), then tinkering with your host machine’s environment for context switching may be painful, if not impossible, to get right. See below for an exaggerated (but not unrealistic) situation.
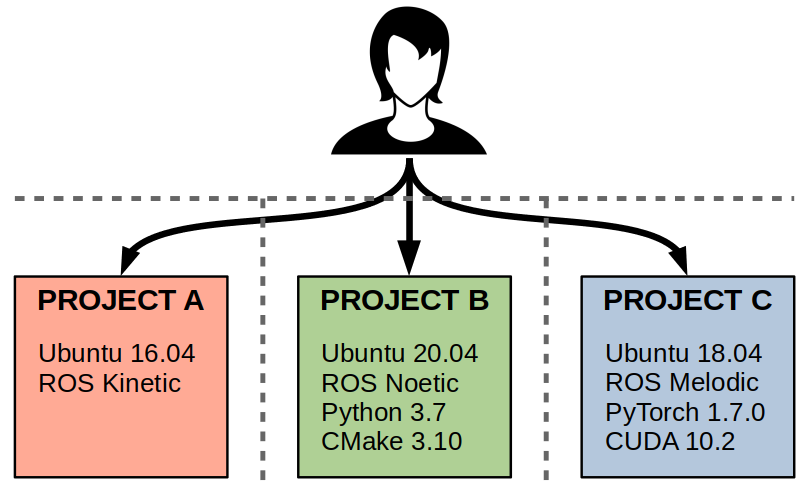
Icon made by Freepik from www.flaticon.com
Creating a Docker image with ROS
First things first: If you can, you should absolutely rely on the prebuilt OSRF ROS images on Docker Hub. Once you’ve installed Docker, you can directly pull one of these images with a single command. For example, to get the full ROS Noetic desktop install directly from the source:
docker pull osrf/ros:noetic-desktop-full
Once you’ve set this up, you can go into a container and do your ROS activities. For example, the following line will start a ROS master inside a container.
docker run -it osrf/ros:noetic-desktop-full roscore
Now open another Terminal, enter a Bash shell inside the container, and see if you can list the available ROS topics:
docker run -it osrf/ros:noetic-desktop-full bash
# rostopic list
ERROR: Unable to communicate with master!
As you see, this did not work because each container is completely isolated unless you explicitly allow them to talk to each other. There are many Docker networking options, but one common one is to allow the containers to share the same network as the host. Try the same lines again with the following extra arguments:
docker run -it --net=host osrf/ros:noetic-desktop-full roscore

docker run -it --net=host osrf/ros:noetic-desktop-full bash
# rostopic list
/rosout
/rosout_agg
Now, you could open a few Terminals inside your container and see if you can publish and subscribe to ROS topics using the command-line tools. For example, try running the following commands in 3 separate Terminals, ensuring you start the Docker container with host networking.
roscore

rostopic pub -r 1 /my_topic std_msgs/String '{data: "hello"}'

rostopic echo /my_topic
If you happen to have ROS installed on your host machine, you could also try to publish/subscribe between the host and container.
Graphics Inside Docker Containers
Now we should have an isolated ROS development environment with some TurtleBot3 packages… but if you try running anything with graphics you’ll find this isn’t going to immediately work out the gate. For example, try the following command (the -it arguments denote interactive shells so you can actually see the output).
docker run -it --net=host osrf/ros:noetic-desktop-full bash -it -c "roslaunch gazebo_ros empty_world.launch"
According to the ROS Wiki, there are several ways to get graphics to work from inside a Docker container — and this is key for ROS workflows full of visual tools like RViz, rqt, and Gazebo. Taking the simplest (but least secure) of the approaches, which is to allow Docker to use the host machine’s X11 socket, we can do the following:
xhost +

docker run -it --net=host \
    --env="DISPLAY" \
    --env="QT_X11_NO_MITSHM=1" \
    --volume="/tmp/.X11-unix:/tmp/.X11-unix:rw" \
    osrf/ros:noetic-desktop-full \
    bash -it -c "roslaunch gazebo_ros empty_world.launch"
NOTE: You only have to run xhost + once each time you log into the machine. These settings persist per login session.
However, in my experience this approach is not bulletproof. In fact, the instructions from the ROS Wiki on their own do not work on my personal laptop. This is where the NVIDIA Container Toolkit comes in. As long as you have an NVIDIA GPU with the right drivers (which in Ubuntu is a feat in itself, to be honest), you can get around some of the pesky display issues and additionally get support for other GPU accelerated tasks such as CUDA and OpenGL. Once you install the NVIDIA Container Toolkit, the above command gets a few more pieces tacked on. For example:
docker run -it --net=host --gpus all \
    --env="NVIDIA_DRIVER_CAPABILITIES=all" \
    --env="DISPLAY" \
    --env="QT_X11_NO_MITSHM=1" \
    --volume="/tmp/.X11-unix:/tmp/.X11-unix:rw" \
    osrf/ros:noetic-desktop-full \
    bash -it -c "roslaunch gazebo_ros empty_world.launch"
One more recommendation — which I know is a backpedal from my original suggestion — is if you need to rely on graphics and GPU acceleration, don’t start with the OSRF ROS Docker images. Instead, go to the NVIDIA Docker Hub and look for the nvidia/cuda or nvidia/cudagl images.
While you’ll have to edit your Dockerfile to install ROS, it’s undoubtedly easier than figuring out how to get NVIDIA drivers into an existing ROS image. Here’s a minimal example whose steps are directly based on the official ROS Noetic install instructions.
FROM nvidia/cudagl:11.1.1-base-ubuntu20.04

# Minimal setup
RUN apt-get update \
 && apt-get install -y locales lsb-release
ARG DEBIAN_FRONTEND=noninteractive
RUN dpkg-reconfigure locales

# Install ROS Noetic
RUN sh -c 'echo "deb http://packages.ros.org/ros/ubuntu $(lsb_release -sc) main" > /etc/apt/sources.list.d/ros-latest.list'
RUN apt-key adv --keyserver 'hkp://keyserver.ubuntu.com:80' --recv-key C1CF6E31E6BADE8868B172B4F42ED6FBAB17C654
RUN apt-get update \
 && apt-get install -y --no-install-recommends ros-noetic-desktop-full
RUN apt-get install -y --no-install-recommends python3-rosdep
RUN rosdep init \
 && rosdep fix-permissions \
 && rosdep update
RUN echo "source /opt/ros/noetic/setup.bash" >> ~/.bashrc
Then, you can build this new image, which I’m naming nvidia_ros, and test out all of the promised capabilities.
# Build the Dockerfile
docker build -t nvidia_ros .

# Start a terminal
docker run -it --net=host --gpus all \
    --env="NVIDIA_DRIVER_CAPABILITIES=all" \
    --env="DISPLAY" \
    --env="QT_X11_NO_MITSHM=1" \
    --volume="/tmp/.X11-unix:/tmp/.X11-unix:rw" \
    nvidia_ros \
    bash
Once you’re inside the Docker container, you can run some tests like the following:
# Test GUI based tools
rqt
gazebo
roscore & rviz

# Check CUDA functionality
nvidia-smi

# Check OpenGL functionality
apt-get install mesa-utils
glxgears
Stack ’em: Multi-Stage Builds
One of the great things about Docker is the ability to create multi-stage builds, where one image stacks on top of the other. We already saw this in the last section in that we created our nvidia_ros image to build on top of the nvidia/cudagl:11.1.1-base-ubuntu20.04 image… but it doesn’t have to stop there.
Now that we have a “core” image that has all our NVIDIA and ROS support, we can create a “base” image on top of that, which installs everything needed to run the standard examples from the TurtleBot3 manual.

Our base image would look as follows:
FROM nvidia_ros:latest

# Change the default shell to Bash
SHELL [ "/bin/bash" , "-c" ]

# Install Git
RUN apt-get update && apt-get install -y git

# Create a Catkin workspace and clone TurtleBot3 repos
RUN source /opt/ros/noetic/setup.bash \
 && mkdir -p /turtlebot3_ws/src \
 && cd /turtlebot3_ws/src \
 && catkin_init_workspace \
 && git clone -b noetic-devel https://github.com/ROBOTIS-GIT/turtlebot3.git \
 && git clone -b noetic-devel https://github.com/ROBOTIS-GIT/turtlebot3_msgs.git \
 && git clone -b noetic-devel https://github.com/ROBOTIS-GIT/turtlebot3_simulations.git
RUN echo "export TURTLEBOT3_MODEL=waffle_pi" >> ~/.bashrc

# Build the Catkin workspace and ensure it's sourced
RUN source /opt/ros/noetic/setup.bash \
 && cd turtlebot3_ws \
 && catkin_make
RUN echo "source /turtlebot3_ws/devel/setup.bash" >> ~/.bashrc

# Set the working folder at startup
WORKDIR /turtlebot3_ws
Then we can build both our images, where the -f flag refers to the file name to use and -t refers to the name of the target container. Otherwise, Docker will by default look for a file in the current folder named Dockerfile.
docker build -f dockerfile_nvidia_ros -t nvidia_ros .
docker build -f dockerfile_tb3_base -t turtlebot3_base .
Since I don’t want to type out all the docker run options anymore (and I presume you don’t want to either), I made a run_docker.sh script that makes this a little easier. With this script, the following commands are equivalent.
# Original command (broke)
docker run -it --net=host --gpus all \
    --env="NVIDIA_DRIVER_CAPABILITIES=all" \
    --env="DISPLAY" \
    --env="QT_X11_NO_MITSHM=1" \
    --volume="/tmp/.X11-unix:/tmp/.X11-unix:rw" \
    turtlebot3_base \
    roslaunch gazebo_ros empty_world.launch

# Command from our script (woke)
./run_docker.sh turtlebot3_base "roslaunch gazebo_ros empty_world.launch"

# We'll see even more abstraction later (bespoke)
So now, we can start a simulated robot and drive it around with our keyboard… all from inside Docker containers. From two separate Terminals, try this out:
./run_docker.sh turtlebot3_base "roslaunch turtlebot3_gazebo turtlebot3_world.launch"

./run_docker.sh turtlebot3_base "roslaunch turtlebot3_teleop turtlebot3_teleop_key.launch"

Developing In Docker: Copy vs. Mount
Now it’s time for a third Docker image: our “overlay” image. Now we we’ve tackled all the dependencies such as ROS and the TurtleBot3 packages, we finally get to our own code under development. Here is where we’ll use the code from my GitHub repository, and specifically the files we want to set up are the tb3_autonomy and tb3_world Catkin packages.
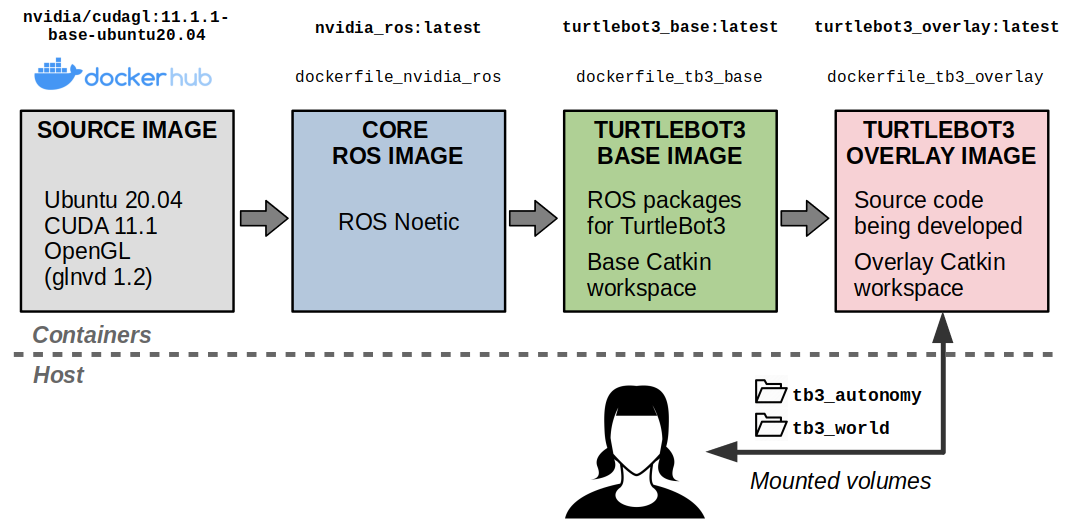
Icon made by Freepik from www.flaticon.com
Our overlay Dockerfile will look as follows:
FROM turtlebot3_base:latest

# Create an overlay Catkin workspace
RUN source /opt/ros/noetic/setup.bash \
 && mkdir -p /overlay_ws/src \
 && cd /overlay_ws \
 && catkin_init_workspace
COPY ./tb3_autonomy/ /overlay_ws/src/tb3_autonomy/
COPY ./tb3_worlds/ /overlay_ws/src/tb3_worlds/
RUN source /opt/ros/noetic/setup.bash \
 && cd /overlay_ws \
 && catkin config --extend /turtlebot3_ws/devel \
 && catkin build -j4

# Set up the work directory and entrypoint
WORKDIR /overlay_ws
As we plan to modify this code regularly during development, we need to think about how to add these files to our Docker image. Specifically, we have two options:
- Copying files: This is what is shown in the Dockerfile above. Whenever you modify a file on the host, you have to rebuild the entire image for the changes to go through. Docker does have a build cache, so building will at least resume from the line in which you copy files over. Alternatively, if you modify the files inside a container, those changes will not persist once you exit the container.
- Mounting volumes: This is the better option if you want persistent files that are shared between the host machine and your containers. Unlike copied files, which are available at build time, mounted files are only available at runtime (that is, after build). So if you need any of your source files to actually build an image, consider copying only the files you need while building.
Of course, once you are done developing the act of copying your code (or cloning it from source control) is a one-and-done thing… unless you expect your end users to still be modifying the code. So mounting volumes can still be useful even for deployment. You just don’t necessarily want to mount everything.
# Build the Dockerfile
docker build -f dockerfile_tb3_overlay -t turtlebot3_overlay .

# Start a terminal with mounted volumes
docker run -it --net=host --gpus all \
    --env="NVIDIA_DRIVER_CAPABILITIES=all" \
    --env="DISPLAY" \
    --env="QT_X11_NO_MITSHM=1" \
    --volume="/tmp/.X11-unix:/tmp/.X11-unix:rw" \
    --volume="${PWD}/tb3_autonomy":"/overlay_ws/src/tb3_autonomy":rw \
	--volume="${PWD}/tb3_worlds":"/overlay_ws/src/tb3_worlds":rw \
    nvidia_ros \
    bash
According to the volumes we added to our massive docker run command, now the tb3_autonomy and tb3_worlds folders are shared between the host and container file systems.
When dealing with Python code or scripting languages in general, you can simply modify files on your host and immediately see the changes inside the container. For compiled languages like C++ or anything else that requires building, like updating Catkin packages, you will have to rebuild inside the container. Unless you explicitly mount these build artifacts (for example, the devel, build, and logs folders in a Catkin workspace), these generated files will not be persistent. Depending on how long your Catkin packages take to build, and how often you are rebuilding inside containers, you may want to consider some intelligence with these files in addition to the source files.
Automating Entry Points
At this point our Docker commands are getting… a little long, to say the least.
Here I also want to introduce the concept of an entrypoint in Docker. In short, entrypoints allow you control the default behavior when running a command in a container. For ROS based workflows, entrypoints are great for sourcing workspaces and setting environment variables.
You can add an entrypoint to a Dockerfile as follows:
COPY ./docker/entrypoint.sh /
ENTRYPOINT [ "/entrypoint.sh" ]
… where the entrypoint.sh file in our case looks as follows. In brief, we are sourcing the necessary Catkin workspaces (if they have been built and have an associated setup.bash file), and defining some environment variables needed for our simulation. Most importantly, the shebang operator at the beginning (#!/bin/bash) is instructing the container to use Bash as its default shell so the source commands actually work, and so we don’t have to explicitly use the bash -it -c "command" syntax we had been relying on up untli now.
#!/bin/bash

# Source ROS and Catkin workspaces
source /opt/ros/noetic/setup.bash
if [ -f /turtlebot3_ws/devel/setup.bash ]
then
  source /turtlebot3_ws/devel/setup.bash
fi
if [ -f /overlay_ws/devel/setup.bash ]
then
  source /overlay_ws/devel/setup.bash
fi
echo "Sourced Catkin workspace!"

# Set environment variables
export TURTLEBOT3_MODEL=waffle_pi
export GAZEBO_MODEL_PATH=$GAZEBO_MODEL_PATH:$(rospack find tb3_worlds)/models

# Execute the command passed into this entrypoint
exec "$@"
NOTE: I have left the rest of this section intact as a reference, but I highly recommend using Docker Compose instead. For more information, refer to my post An Updated Guide to Docker and ROS 2.
We already saw how writing a script around docker run was useful for abstracting away a lot of details, but I have one more recommendation to share. This is the use of GNU make to define easy-to-use entrypoints to your code. We do this by creating a Makefile and a set of “rules”, which consist of named targets with prequisites and recipes (that is, what actually executes when you run a target). For more information, refer to the Introduction chapter of the make documentation.
First, we can create variables so that we can reuse all the volumes and environment variables across various docker run commands. Finally!
DOCKER_VOLUMES = \
	--volume="${PWD}/tb3_autonomy":"/overlay_ws/src/tb3_autonomy":rw \
	--volume="${PWD}/tb3_worlds":"/overlay_ws/src/tb3_worlds":rw \
	--volume="/tmp/.X11-unix:/tmp/.X11-unix:rw"
DOCKER_ENV_VARS = \
	--env="NVIDIA_DRIVER_CAPABILITIES=all" \
	--env="DISPLAY" \
	--env="QT_X11_NO_MITSHM=1"
DOCKER_ARGS = ${DOCKER_VOLUMES} ${DOCKER_ENV_VARS}
Next, we can create phony targets to build all our Docker images. Notice the chain of prerequisites from core to base to overlay images. So you can directly instruct a build of the overlay image and the other two targets will execute run first.
# Build the core image
.PHONY: build-core
build-core:
	@docker build -f ./docker/dockerfile_nvidia_ros -t nvidia_ros .

# Build the base image
.PHONY: build-base
build-base:
	@docker build -f ./docker/dockerfile_tb3_base -t turtlebot3_base .

# Build the overlay image (depends on base image build)
.PHONY: build
build: build-base
	@docker build -f ./docker/dockerfile_tb3_overlay -t turtlebot3_overlay .
After that, we can create task-specific targets; that is, targets that will run commands inside Docker once we’ve defined our convenience variables and built our containers.
# Start a terminal inside the Docker container
.PHONY: term
term:
	@docker run -it --net=host --gpus all \
		${DOCKER_ARGS} turtlebot3_overlay bash

# Start basic simulation included with TurtleBot3 packages
.PHONY: sim
sim:
	@docker run -it --net=host --gpus all \
		${DOCKER_ARGS} turtlebot3_overlay \
		roslaunch turtlebot3_gazebo turtlebot3_world.launch
The full Makefile has can be found in my GitHub repository. This also defines make targets that run our examples in the overlay workspace. For example, the following two commands will respectively start a simulated robot in a demo world and a node that manages the high-level robot behavior to navigate the world.
make demo-world
make demo-behavior

Conclusion
Thank you for braving another post that turned out way more comprehensive than originally intended. I would like to leave you with some resources to further your understanding of these tricky concepts.
- Download my example files from this GitHub repo.
- Directly from the source, look at the Best Practices for Writing Dockerfiles page.
- Check out
rockerby OSRF (the makers of ROS). - For more advanced multi-container workflows, look at Docker Compose and its corresponding ROS Wiki page... (update 07/2023) or check out my follow-on post An Updated Guide to Docker and ROS 2.
See you in other posts, in which I will actually talk about the robotics examples contained in the example repository. After all, software tools like Docker and ROS are a means to an end, and for us that end is to do cool stuff with robots.
Great Post! Be careful using ‘xhost +’ since it gives permissions to everyone. Using ‘xhost + local:docker’ is safer.
This is a great tutorial! Many thanks for sharing!
Is there a way of creating an user and not running the container as root?
hi, I currently use docker with ros.I really liked your explanation.
I want share the form that i am use to run a ros melodic container, i have this code in .bashrc and any terminal you can run melodic and open a interactive bash.
xhost +local:docker;
export CNG_PATH=”${HOME}/ros/melodic”;
melodic()
{
if [ “$(docker ps -qaf name=melodic)” = “” ]; then
echo ‘Container not found, creating it …’;
docker run -it \
–name melodic \
–privileged \
–mount type=bind,source=$CNG_PATH,destination=/home/user/catkin_ws/ \
–env DISPLAY=$DISPLAY \
–network host \
–volume /tmp/.X11-unix:/tmp/.X11-unix \
-p 11311:11311 \
-p 9090:9090 \
osrf/ros:melodic-desktop-full-bionic \
;
else
if [ “${1}” = “restart” ] && ! docker stop melodic > /dev/null; then
echo ‘Error while stopping the container, exiting now …’;
return 1;
fi;
if ! docker start melodic > /dev/null; then
echo ‘Error while starting the container, exiting now …’;
return 1;
fi;
echo ‘melodic found and running, executing a shell …’;
docker exec -it melodic bash –login;
fi;
};
great!!!
Great! Thank you so much. This save much of time, and maybe only one way when we want to dev with ROS1 on the ubuntu 22.04
Thank you very much. This is the best resource for me to learn Docker with ROS so far.
Amazing tutorial. I know nothing about ROS and my first goal is to use ROS via Docker because I know too well the pain it takes when install stuffs directly to the OS. Your writeup so so cool, it runs well in every single line.
What can I do when I am using MacOs ?