
2 years ago, I wrote A Guide to Docker and ROS, which is one of my most frequently viewed posts — likely because it is a tricky topic and people were seeking answers. Since then, I’ve had the chance to use Docker more in my work and have picked up some new tricks. This was long overdue, but I’ve finally collected my updated learnings in this post.
Recently, I encountered an article titled ROS Docker; 6 reasons why they are not a good fit, and I largely agree with it. However, the reality is that it’s still quite difficult to ensure a reproducible ROS environment for people who haven’t spent years fighting the ROS learning curve and are adept at debugging dependency and/or build errors… so Docker is still very much a crutch that we fall back on to get working demos (and sometimes products!) out the door.
If the article above hasn’t completely discouraged you from embarking on this Docker adventure, please enjoy reading.
Revisiting Our Dockerfile with ROS 2
Now that ROS 1 is on its final version and approaching end of life in 2025, I thought it would be appropriate to rehash the TurtleBot3 example repo from the previous post using ROS 2.
Most of the big changes in this upgrade have to do with ROS 2, including client libraries, launch files, and configuring DDS. The examples themselves have been updated to use the latest tools for behavior trees: BehaviorTree.CPP 4 / Groot 2 for C++ and py_trees / py_trees_ros_viewer for Python. For more information on the example and/or behavior trees, refer to my Introduction to Behavior Trees post.
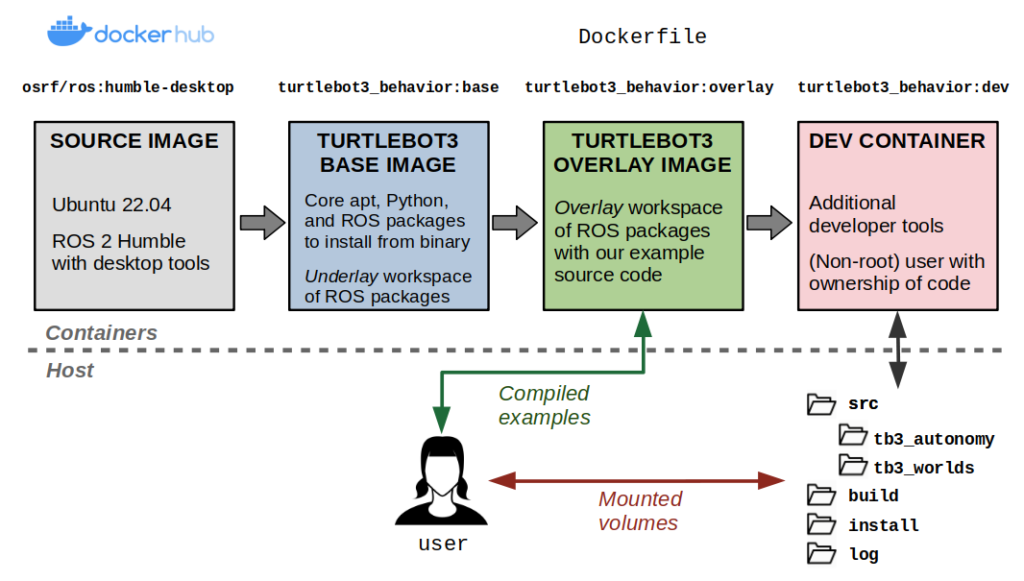
From a Docker standpoint, there aren’t too many differences. Our container layout will now be as follows:
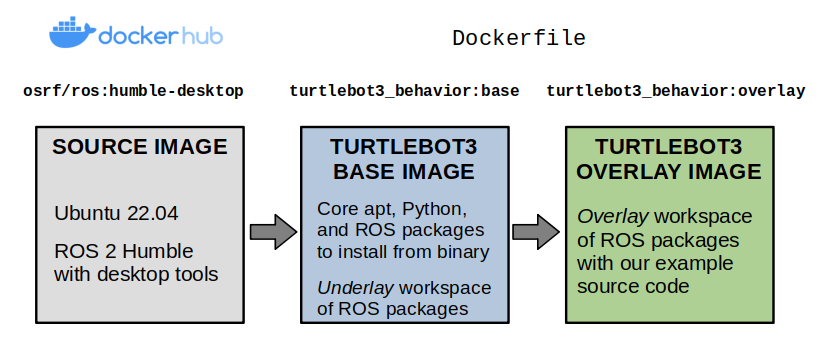
We’ll start by making our Dockerfile, which defines the contents of our image. Our initial base layer inherits from one of the public ROS images, ros:humble, and sets up the dependencies from our example repository into an underlay workspace. These are defined using a vcstool repos file.
Notice that we’ve set up the argument, ARG ROS_DISTRO=humble, so it can be changed for other distributions of ROS 2 (Iron, Rolling, etc.). Rather than creating multiple Dockerfiles for different configurations, you should try using build arguments like these as much as possible without being “overly clever” in a way that impacts readability.
ARG ROS_DISTRO=humble

########################################
# Base Image for TurtleBot3 Simulation #
########################################
FROM ros:${ROS_DISTRO} as base
ENV ROS_DISTRO=${ROS_DISTRO}
SHELL ["/bin/bash", "-c"]

# Create Colcon workspace with external dependencies
RUN mkdir -p /turtlebot3_ws/src
WORKDIR /turtlebot3_ws/src
COPY dependencies.repos .
RUN vcs import < dependencies.repos

# Build the base Colcon workspace, installing dependencies first.
WORKDIR /turtlebot3_ws
RUN source /opt/ros/${ROS_DISTRO}/setup.bash \
 && apt-get update -y \
 && rosdep install --from-paths src --ignore-src --rosdistro ${ROS_DISTRO} -y \
 && colcon build --symlink-install
ENV TURTLEBOT3_MODEL=waffle_pi
To build your image with a specific argument — let’s say you want to use ROS 2 Rolling instead — you could do the following… provided that all your references to ${ROS_DISTRO} actually have something that correctly resolves to the rolling distribution.
docker build -f docker/Dockerfile \
    --build-arg="ROS_DISTRO=rolling" \
    --target base -t turtlebot3_behavior:base .
I personally have had many issues in ROS 2 Humble and later with the default DDS vendor (FastDDS), so I like to switch my default implementation to Cyclone DDS by installing it and setting an environment variable to ensure it is always used.
# Use Cyclone DDS as middleware
RUN apt-get update && apt-get install -y --no-install-recommends \
 ros-${ROS_DISTRO}-rmw-cyclonedds-cpp
ENV RMW_IMPLEMENTATION=rmw_cyclonedds_cpp
Now, we will create our overlay layer. Here, we will copy over the example source code, install any missing dependencies with rosdep install, and set up an entrypoint to run every time a container is launched.
###########################################
# Overlay Image for TurtleBot3 Simulation #
###########################################
FROM base AS overlay

# Create an overlay Colcon workspace
RUN mkdir -p /overlay_ws/src
WORKDIR /overlay_ws
COPY ./tb3_autonomy/ ./src/tb3_autonomy/
COPY ./tb3_worlds/ ./src/tb3_worlds/
RUN source /turtlebot3_ws/install/setup.bash \
 && rosdep install --from-paths src --ignore-src --rosdistro ${ROS_DISTRO} -y \
 && colcon build --symlink-install

# Set up the entrypoint
COPY ./docker/entrypoint.sh /
ENTRYPOINT [ "/entrypoint.sh" ]
The entrypoint defined above is a Bash script that sources ROS 2 and any workspaces that are built, and sets up environment variables necessary to run our TurtleBot3 examples. You can use entrypoints to do any other types of setup you might find useful for your application.
#!/bin/bash
# Basic entrypoint for ROS / Colcon Docker containers

# Source ROS 2
source /opt/ros/${ROS_DISTRO}/setup.bash

# Source the base workspace, if built
if [ -f /turtlebot3_ws/install/setup.bash ]
then
  source /turtlebot3_ws/install/setup.bash
  export TURTLEBOT3_MODEL=waffle_pi
  export GAZEBO_MODEL_PATH=$GAZEBO_MODEL_PATH:$(ros2 pkg prefix turtlebot3_gazebo)/share/turtlebot3_gazebo/models
fi

# Source the overlay workspace, if built
if [ -f /overlay_ws/install/setup.bash ]
then
  source /overlay_ws/install/setup.bash
  export GAZEBO_MODEL_PATH=$GAZEBO_MODEL_PATH:$(ros2 pkg prefix tb3_worlds)/share/tb3_worlds/models
fi

# Execute the command passed into this entrypoint
exec "$@"
At this point, you should be able to build the full Dockerfile:
docker build \
    -f docker/Dockerfile --target overlay \
    -t turtlebot3_behavior:overlay  .
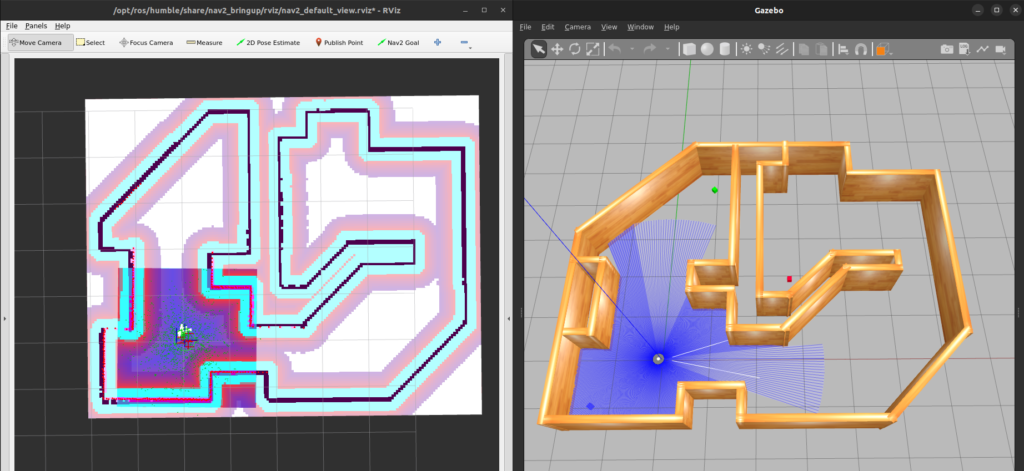
Then, we can start one of our example launch files with the right settings with this mouthful of a command. Most of these environment variables and volumes are needed to have graphics and ROS 2 networking functioning properly from inside our container.
docker run -it --net=host --ipc=host --privileged \
    --env="DISPLAY" \
    --env="QT_X11_NO_MITSHM=1" \
    --volume="/tmp/.X11-unix:/tmp/.X11-unix:rw" \
    --volume="${XAUTHORITY}:/root/.Xauthority" \
    turtlebot3_behavior:overlay \
    bash -c "ros2 launch tb3_worlds tb3_demo_world.launch.py"
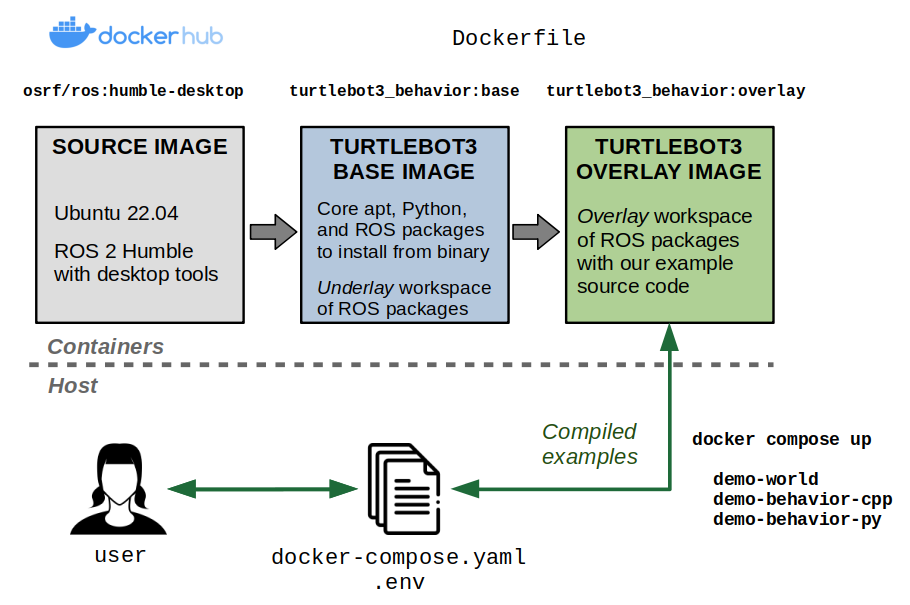
Introducing Docker Compose
From the last few snippets, we can see how the docker build and docker run commands can get really long and unwieldy as we add more options. You can wrap this in several abstractions, including scripting languages and Makefiles… but Docker has already solved this problem through Docker Compose.
In brief, Docker Compose allows you to create a YAML file that captures all the configuration needed to set up building images and running containers.
Docker Compose also differentiates itself from the “plain” Docker command in its ability to orchestrate services. This involves building multiple images or targets within the same image(s) and launching several programs at the same time that comprise an entire application. It also lets you extend existing services to minimize copy-pasting of the same settings in multiple places, define variables, and more.
The end goal is that we have short commands to manage our examples:
docker compose buildwill build what we needdocker compose up <service names>will launch what we need
The default name of this magical YAML file is docker-compose.yaml. For our example, the docker-compose.yaml file looks as follows:
version: "3.9"
services:
  # Base image containing dependencies.
  base:
    image: turtlebot3_behavior:base
    build:
      context: .
      dockerfile: docker/Dockerfile
      args:
        ROS_DISTRO: humble
      target: base
    # Interactive shell
    stdin_open: true
    tty: true
    # Networking and IPC for ROS 2
    network_mode: host
    ipc: host
    # Needed to display graphical applications
    privileged: true
    environment:
      # Needed to define a TurtleBot3 model type
      - TURTLEBOT3_MODEL=${TURTLEBOT3_MODEL:-waffle_pi}
      # Allows graphical programs in the container.
      - DISPLAY=${DISPLAY}
      - QT_X11_NO_MITSHM=1
      - NVIDIA_DRIVER_CAPABILITIES=all
    volumes:
      # Allows graphical programs in the container.
      - /tmp/.X11-unix:/tmp/.X11-unix:rw
      - ${XAUTHORITY:-$HOME/.Xauthority}:/root/.Xauthority

  # Overlay image containing the example source code.
  overlay:
    extends: base
    image: turtlebot3_behavior:overlay
    build:
      context: .
      dockerfile: docker/Dockerfile
      target: overlay

  # Demo world
  demo-world:
    extends: overlay
    command: ros2 launch tb3_worlds tb3_demo_world.launch.py

  # Behavior demo using Python and py_trees
  demo-behavior-py:
    extends: overlay
    command: >
      ros2 launch tb3_autonomy tb3_demo_behavior_py.launch.py
      tree_type:=${BT_TYPE:?}
      enable_vision:=${ENABLE_VISION:?}
      target_color:=${TARGET_COLOR:?}

  # Behavior demo using C++ and BehaviorTree.CPP
  demo-behavior-cpp:
    extends: overlay
    command: >
      ros2 launch tb3_autonomy tb3_demo_behavior_cpp.launch.py
      tree_type:=${BT_TYPE:?}
      enable_vision:=${ENABLE_VISION:?}
      target_color:=${TARGET_COLOR:?}
As you can see from the Docker Compose file above, you can specify variables using the familiar $ operator in Unix based systems. These variables will by default be read from either your host environment or through an environment file (usually called .env). Our example.env file looks like this:
# TurtleBot3 model
TURTLEBOT3_MODEL=waffle_pi

# Behavior tree type: Can be naive or queue.
BT_TYPE=queue

# Set to true to use vision, else false to only do navigation behaviors.
ENABLE_VISION=true

# Target color for vision: Can be red, green, or blue.
TARGET_COLOR=blue
At this point, you can build everything:
# By default, picks up a `docker-compose.yaml` and `.env` file.
docker compose build

# You can also explicitly specify the files
docker compose --file docker-compose.yaml --env-file .env build
Then, you can run the services you care about:
# Bring up the simulation
docker compose up demo-world

# After the simulation has started,
# launch one of these in a separate Terminal
docker compose up demo-behavior-py
docker compose up demo-behavior-cpp
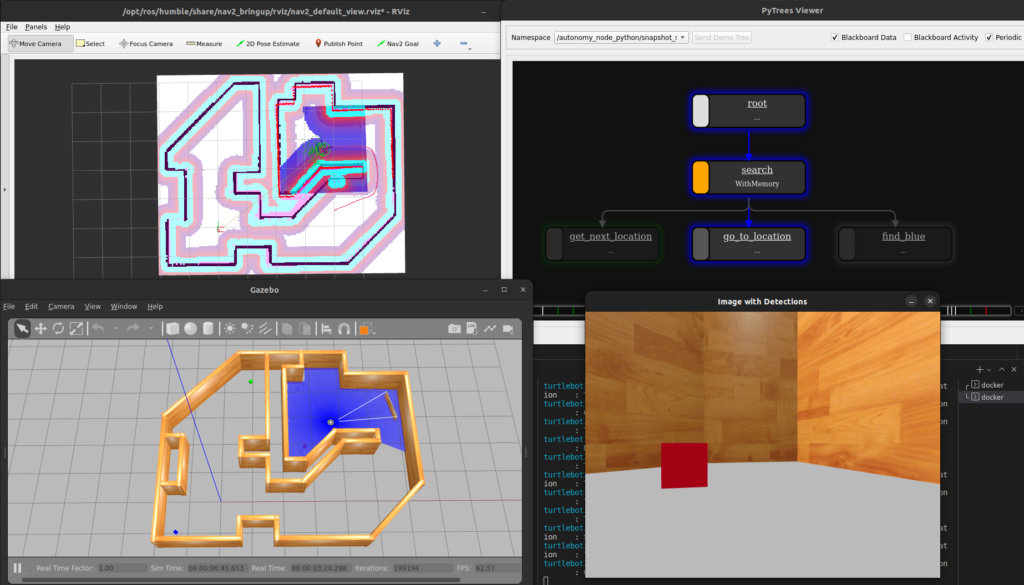
py_trees as the Behavior Tree.Setting up Developer Containers
Our example so far works great if we want to package up working examples to other users. However, if you want to develop the example code within this environment, you will need to overcome the following obstacles:
- Every time you modify your code, you will need to rebuild the Docker image. This makes it extremely inefficient to get feedback on whether your changes are working as intended. This is already an instant deal-breaker.
- You can solve the above by using bind mounts to sync up the code on your host machine with that in the container. This gets us on the right track, but you’ll find that any files generated inside the container and mounted on the host will be owned by
rootas default. You can get around this by whipping out thesudoandchownhammer, but it’s not necessary. - All the tools you may use for development, including debuggers, are likely missing inside the container… unless you install them in the Dockerfile, which can bloat the size of your distribution image.
Luckily, there is a concept of a developer container (or dev container). To put it simply, this is a separate container that lets you actually do your development in the same Docker environment you would use to deploy your application.
There are many ways of implementing dev containers. For our example, we will modify the Dockerfile to add a new dev target that extends our existing overlay target.
This dev container will do the following:
- Install additional packages that we may find helpful for development, such as debuggers, text editors, and graphical developer tools. Critically, these will not be part of the
overlaylayer that we will ship to end users. - Create a new user that has the same user and group identifiers as the user that built the container on the host. This will make it such that all files generated within the container (in folders we care about) have the same ownership settings as if we had created the file on our host. By “folders we care about”, we are referring to the ROS workspace that contains the source code.
- Put our entrypoint script in the user’s Bash profile (
~/.bashrcfile). This lets us source our ROS environment not just at container startup, but every time we attach a new interactive shell while our dev container remains up.
#####################
# Development Image #
#####################
FROM overlay as dev

# Dev container arguments
ARG USERNAME=devuser
ARG UID=1000
ARG GID=${UID}

# Install extra tools for development
RUN apt-get update && apt-get install -y --no-install-recommends \
 gdb gdbserver nano

# Create new user and home directory
RUN groupadd --gid $GID $USERNAME \
 && useradd --uid ${GID} --gid ${UID} --create-home ${USERNAME} \
 && echo ${USERNAME} ALL=\(root\) NOPASSWD:ALL > /etc/sudoers.d/${USERNAME} \
 && chmod 0440 /etc/sudoers.d/${USERNAME} \
 && mkdir -p /home/${USERNAME} \
 && chown -R ${UID}:${GID} /home/${USERNAME}

# Set the ownership of the overlay workspace to the new user
RUN chown -R ${UID}:${GID} /overlay_ws/

# Set the user and source entrypoint in the user's .bashrc file
USER ${USERNAME}
RUN echo "source /entrypoint.sh" >> /home/${USERNAME}/.bashrc
You can then add a new dev service to the docker-compose.yaml file. Notice that we’re adding the source code as volumes to mount, but we’re also mapping the folders generated by colcon build to a .colcon folder on our host file system. This makes it such that generated build artifacts persist between stopping our dev container and bringing it back up, otherwise we’d have to do a clean rebuild every time.
  dev:
    extends: overlay
    image: turtlebot3_behavior:dev
    build:
      context: .
      dockerfile: docker/Dockerfile
      target: dev
      args:
        - UID=${UID:-1000}
        - GID=${UID:-1000}
        - USERNAME=${USERNAME:-devuser}
    volumes:
      # Mount the source code
      - ./tb3_autonomy:/overlay_ws/src/tb3_autonomy:rw
      - ./tb3_worlds:/overlay_ws/src/tb3_worlds:rw
      # Mount colcon build artifacts for faster rebuilds
      - ./.colcon/build/:/overlay_ws/build/:rw
      - ./.colcon/install/:/overlay_ws/install/:rw
      - ./.colcon/log/:/overlay_ws/log/:rw
    user: ${USERNAME:-devuser}
    command: sleep infinity
At this point you can do:
# Start the dev container
docker compose up dev

# Attach an interactive shell in a separate Terminal
# NOTE: You can do this multiple times!
docker compose exec -it dev bash
Because we have mounted the source code, you can make modifications on your host and rebuild inside the dev container… or you can use handy tools like the Visual Studio Code Containers extension to directly develop inside the container. Up to you.
For example, once you’re inside the container you can build the workspace with:
colcon build
Due to our volume mounts, you’ll see that the contents of the .colcon/build, .colcon/install, and .colcon/log folders in your host have been populated. This means that if you shut down the dev container and bring up a new instance, these files will continue to exist and will speed up rebuilds using colcon build.
Also, because we have gone through the trouble of making a user, you’ll see that these files are not owned by root, so you can delete them if you’d like to clean out the build artifacts. You should try this without making the new user and you’ll run into some annoying permissions roadblocks.
$ ls -al .colcon
total 20
drwxrwxr-x  5 sebastian sebastian 4096 Jul  9 10:15 .
drwxrwxr-x 10 sebastian sebastian 4096 Jul  9 10:15 ..
drwxrwxr-x  4 sebastian sebastian 4096 Jul  9 11:29 build
drwxrwxr-x  4 sebastian sebastian 4096 Jul  9 11:29 install
drwxrwxr-x  5 sebastian sebastian 4096 Jul  9 11:31 log
The concept of dev containers is so widespread at this point that a standard has emerged at containers.dev. I also want to point out some other great resources including Allison Thackston’s blog, Griswald Brooks’ GitHub repo, and the official VSCode dev containers tutorial.
Conclusion
In this post, you have seen how Docker and Docker Compose can help you create reproducible ROS 2 environments. This includes the ability to configure variables at build and run time, as well as creating dev containers to help you develop your code in these environments before distributing it to others.
We’ve only scratched the surface in this post, so make sure you poke around at the resources linked throughout, try out the example repository, and generally stay curious about what else you can do with Docker to make your life (and your users’ lives) easier.
As always, please feel free to reach out with questions and feedback. Docker is a highly configurable tool, so I’m genuinely curious about how this works for you or whether you have approached things differently in your work. I might learn something new!
Nice tutorial about Docker and ROS2 ! It was easy to follow along. How one can utilize host serial port (USB) inside the container? Maybe connecting the program inside the container with Arduino through serial communication or anything else.
In case you are using Linux on your robot computer, you can make a bind-mount volume of your /dev folder, where all devices are listed and can be accessed. Just make sure that inside the container you also have the correct permissions, i.e. you are in the dialout group, for example if you want to use a serial device at ttyUSB0. Then you can just open the port from any program as you would do on local environment.
Great article! But why did you not start from one of the nvidia images like in the previous article? Are there no graphical issues with the most recent images from osrf?
Good eye! The NVIDIA images are mostly useful when you want to have hardware acceleration, CUDA drivers, etc. But for “regular” ROS applications is can be more complicated because you then have to install ROS over the NVIDIA images.
Fantastic article! I’m eager to explore specific steps or recommended practices for incorporating Docker into a real-world robotics setting. I would greatly value any insights you could provide on this topic.
Hi Sebastian, great article!
I have a question regarding using multi container deployments. what are the ways to share message definitions across the containers? for ex. I have container which abstracts the hardware/sensors/actuators from serial/i2c… to ROS msgs. Now other containers need to know about the custom msgs the driver-container is using. What can be done in such situations?
I could go and install those msg packages in all the containers, but i would like to know about more scalable approach.
What are your thoughts on it?